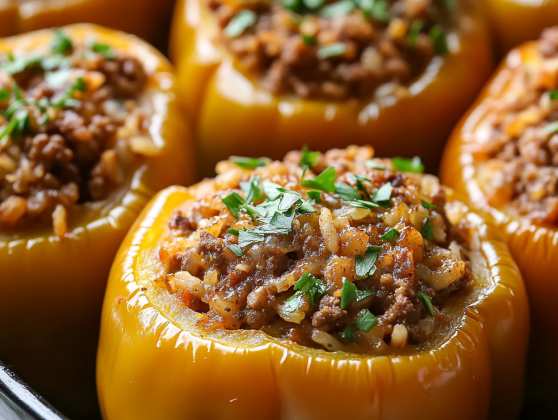
Stuffed bell peppers are a timeless comfort food that combines vibrant bell peppers with a savory filling of seasoned meat, rice, and cheese. This dish is not only delicious but also versatile and nutritious, making it a favorite for family dinners and meal prepping. In this comprehensive guide, we’ll walk you through everything you need to know to make the perfect stuffed bell peppers, from selecting ingredients to step-by-step cooking instructions, nutritional information, and helpful tips.
Why You’ll Love This Recipe
-
Hearty and Satisfying: A complete meal in one dish, combining protein, grains, and vegetables.
-
Customizable: Easily adapt the filling to suit dietary preferences or what’s on hand.
-
Make-Ahead Friendly: Prepare in advance and bake when ready for a convenient meal.
-
Family Favorite: Loved by both kids and adults for its comforting flavors
Ingredients
For the Peppers:
-
6 large bell peppers (any color)
-
1 tablespoon olive oil
-
Salt and freshly ground black pepper, to taste
For the Filling:
-
1 tablespoon olive oil
-
1 medium onion, finely chopped
-
2 cloves garlic, minced
-
1 pound ground beef (or a mix of beef and pork)
-
1 cup cooked rice (white or brown)
-
1 can (14.5 ounces) diced tomatoes, drained
-
1 teaspoon dried oregano
-
1/2 teaspoon smoked paprika
-
1/4 teaspoon red pepper flakes (optional)
-
Salt and freshly ground black pepper, to taste
-
1 cup shredded mozzarella cheese
-
1/4 cup chopped fresh parsley
Directions
1. Prepare the Bell Peppers
-
Preheat your oven to 375°F (190°C).
-
Cut the tops off the bell peppers and remove the seeds and membranes.
-
Lightly brush the outside of the peppers with olive oil and season the insides with a pinch of salt and pepper.
-
Place the peppers upright in a baking dish and bake for 15 minutes to soften slightly.
2. Make the Filling
-
In a large skillet over medium heat, heat the olive oil.
-
Add the chopped onion and cook until translucent, about 5 minutes.
-
Add the minced garlic and cook for another minute.
-
Add the ground beef, breaking it up with a spoon, and cook until browned and cooked through. Drain excess fat if necessary.
-
Stir in the cooked rice, diced tomatoes, oregano, smoked paprika, red pepper flakes (if using), salt, and pepper. Cook for 5 minutes, allowing the flavors to meld.
-
Remove from heat and stir in half of the shredded mozzarella cheese and the chopped parsley.
3. Stuff and Bake
-
Spoon the filling into the pre-baked bell peppers, pressing down gently to pack the filling.
-
Top each stuffed pepper with the remaining mozzarella cheese.
-
Cover the baking dish with foil and bake for 25 minutes.
-
Remove the foil and bake for an additional 10 minutes, or until the cheese is melted and bubbly.
4. Serve
-
Garnish with additional chopped parsley if desired.
-
Serve hot, accompanied by a side salad or crusty bread.
Nutritional Information (Per Serving)
-
Calories: Approximately 350
-
Protein: 25g
-
Carbohydrates: 20g
-
Fat: 18g
-
Fiber: 4g
-
Sugar: 6g
-
Sodium: 450mg
Note: Nutritional values are estimates and may vary based on specific ingredients used.
Recipe Details
-
Servings: 6
-
Prep Time: 20 minutes
-
Cooking Time: 50 minutes
-
Total Time: 1 hour 10 minutes
Tips for Success
-
Pepper Selection: Choose firm, evenly sized bell peppers to ensure even cooking.
-
Rice Options: Leftover rice works great. For added flavor, use rice cooked in broth.
-
Cheese Variations: Try different cheeses like cheddar, provolone, or pepper jack for a twist.
-
Make Ahead: Prepare the filling and stuff the peppers a day in advance. Store covered in the refrigerator and bake when ready.
-
Freezing: Stuffed peppers can be frozen after baking. Cool completely, wrap individually, and freeze. Reheat in the oven until warmed through.
Italian-Style Stuffed Peppers Variation

For an Italian-inspired take on stuffed bell peppers, swap out the ground beef for Italian sausage—either mild or spicy depending on your preference. This brings a rich, aromatic flavor that pairs perfectly with Italian herbs like basil, oregano, and thyme. Instead of standard diced tomatoes, use fire-roasted tomatoes or a hearty marinara sauce to enhance the overall savoriness. You can also add chopped spinach, zucchini, or mushrooms to increase the vegetable content and create more layers of texture and nutrition. Top each pepper with shredded mozzarella and Parmesan cheese before baking. As the cheese melts and browns, it forms a delicious golden crust that adds an irresistible finishing touch. Garnish with fresh basil just before serving for a burst of freshness. This version pairs beautifully with garlic bread and a simple arugula salad tossed with lemon vinaigrette.
What to Serve with Stuffed Bell Peppers
Stuffed bell peppers are a satisfying main dish, but they truly shine when accompanied by complementary sides. A crisp green salad, dressed with a light vinaigrette or lemon-based dressing, provides a refreshing contrast to the rich and hearty filling. For a more filling meal, consider serving them with roasted or mashed potatoes, which soak up the juices from the peppers beautifully. Crusty bread or garlic toast is also a classic companion—perfect for sopping up any extra sauce from the baking dish. If you’re looking for something lighter, steamed or sautéed vegetables such as green beans, asparagus, or broccoli make an excellent, nutritious side. For a Mediterranean twist, try serving with a side of couscous or quinoa tossed with olive oil, lemon, and herbs. And don’t forget a glass of red wine or sparkling water with citrus to round out the meal and balance the flavors.
Storage and Reheating Tips
Stuffed bell peppers store exceptionally well, making them a convenient option for meal prepping or enjoying leftovers throughout the week. To store, allow the peppers to cool completely after baking, then place them in an airtight container and refrigerate for up to 4 days. When reheating, you can use the microwave for convenience—just cover the pepper with a damp paper towel to retain moisture and heat in 1-minute intervals until warmed through. However, the best method for reheating is in the oven, which helps maintain the texture and melts the cheese topping beautifully. Preheat your oven to 350°F (175°C), place the peppers in a baking dish, cover with foil, and heat for about 20 minutes or until hot in the center. If frozen, thaw the peppers overnight in the refrigerator before reheating. For longer storage, you can freeze baked stuffed peppers individually wrapped in foil or plastic wrap and placed in a freezer-safe container for up to 3 months.
Common Questions (FAQ)
Can I make stuffed peppers without rice?
Yes! You can substitute rice with cauliflower rice for a low-carb version or use quinoa for added protein and fiber. You can even skip grains entirely and add extra vegetables or legumes to keep the filling hearty and satisfying.
Do I need to cook the peppers before stuffing them?
It’s not absolutely necessary, but pre-baking the peppers for 10–15 minutes helps to soften them slightly, which results in a more pleasant texture and ensures the peppers are fully cooked once the filling is done.
Can I use ground turkey or chicken instead of beef?
Absolutely. Ground turkey or chicken are leaner alternatives to beef and still create a flavorful dish. Just be sure to season generously and consider adding a bit of olive oil during cooking to avoid dryness.
How do I keep stuffed peppers from falling over while baking?
To prevent tipping, trim a small slice off the bottom of each bell pepper to create a flat base. Alternatively, you can nestle them closely together in the baking dish so they support each other during baking.
Can I make them ahead of time?
Yes! You can fully prepare and stuff the peppers, then refrigerate them (covered) for up to 24 hours before baking. Just add an extra 5–10 minutes to the cooking time if you’re baking them straight from the fridge.
Final Thoughts
Stuffed bell peppers are one of those classic recipes that never go out of style. They’re a brilliant way to turn simple, wholesome ingredients into something that feels special and indulgent. From the vibrant colors of the peppers to the rich, savory filling, each bite is packed with flavor and comfort. Whether you’re sticking with the traditional beef and rice combination or experimenting with vegetarian fillings or international flavors, the adaptability of this dish is one of its biggest strengths. It’s ideal for feeding a crowd, prepping meals ahead of a busy week, or simply making something hearty and homemade. Plus, with its balanced nutrition profile, it’s a dish you can feel good about serving to your family.
Now that you have everything you need to know—from prep to plating—it’s time to make your own perfect batch of stuffed bell peppers. Don’t be afraid to get creative, try new variations, and make the recipe your own. Whether served for a weeknight dinner or as a centerpiece for a cozy weekend meal, these stuffed bell peppers are sure to become a repeat favorite in your kitchen. Bon appétit!
Print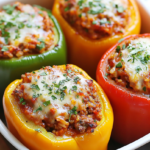
Classic Stuffed Bell Peppers Recipe: Easy and Perfect for Dinner
Ingredients
For the Peppers:
-
6 large bell peppers (any color)
-
1 tablespoon olive oil
-
Salt and freshly ground black pepper, to taste
For the Filling:
-
1 tablespoon olive oil
-
1 medium onion, finely chopped
-
2 cloves garlic, minced
-
1 pound ground beef (or a mix of beef and pork)
-
1 cup cooked rice (white or brown)
-
1 can (14.5 ounces) diced tomatoes, drained
-
1 teaspoon dried oregano
-
1/2 teaspoon smoked paprika
-
1/4 teaspoon red pepper flakes (optional)
-
Salt and freshly ground black pepper, to taste
-
1 cup shredded mozzarella cheese
-
1/4 cup chopped fresh parsley
Instructions
1. Prepare the Bell Peppers
-
Preheat your oven to 375°F (190°C).
-
Cut the tops off the bell peppers and remove the seeds and membranes.
-
Lightly brush the outside of the peppers with olive oil and season the insides with a pinch of salt and pepper.
-
Place the peppers upright in a baking dish and bake for 15 minutes to soften slightly.
2. Make the Filling
-
In a large skillet over medium heat, heat the olive oil.
-
Add the chopped onion and cook until translucent, about 5 minutes.
-
Add the minced garlic and cook for another minute.
-
Add the ground beef, breaking it up with a spoon, and cook until browned and cooked through. Drain excess fat if necessary.
-
Stir in the cooked rice, diced tomatoes, oregano, smoked paprika, red pepper flakes (if using), salt, and pepper. Cook for 5 minutes, allowing the flavors to meld.
-
Remove from heat and stir in half of the shredded mozzarella cheese and the chopped parsley.
3. Stuff and Bake
-
Spoon the filling into the pre-baked bell peppers, pressing down gently to pack the filling.
-
Top each stuffed pepper with the remaining mozzarella cheese.
-
Cover the baking dish with foil and bake for 25 minutes.
-
Remove the foil and bake for an additional 10 minutes, or until the cheese is melted and bubbly.
4. Serve
-
Garnish with additional chopped parsley if desired.
-
Serve hot, accompanied by a side salad or crusty bread.